I've recovered from the disappointment of not being able to sweep and mop every corner of my house. Well, not really , but today is a new day and with it a new challenge. Today's challenge was to sit and medidate on a room in your house. If you want the specifics they can be found here: http://www.apartmenttherapy.com/10-mindful-minutes-get-a-fresh-perspective-january-cure-assignment-3-198654
Let me be completely 100% honest. This was very challenging for me. No TV, internet, music, or distraction of any kind. Considering I have a baby, a husband, a sister that pops in from time to time, and a Mom and Dad staying with us at the moment this was particularly difficult. But it needed to be done and as I have a ton of spaces in my house that could use a fresh perspective it wasn't going to be easy to choose just one.
After much deliberation I decided on the Living room since that is the place where my family spends the most time and it's also the first thing you see when you walk into my house. I did as the assignment said and imagined the room with out stuff. Once I did that I found my mind starting to wonder. What color would I paint the walls, I really hate these blinds in the front windows, I really need to get this desk built. I had to stop myself for a second and refocused on what I needed to do to make that space more functional. As I went along I wrote down a few notes to myself on what I could do to make the flow better and not so much on the aesthetics.
All in all I think that I did pretty well, though it was hard for me to just think of how the space was used and not so much on how it looked.
Wednesday, January 15, 2014

Wednesday, January 8, 2014
January Cure: Day 2
Here we are day two ,well actually day 3 ,but who's counting..... oh right, me. Hmmm, well to be honest the second assignment of sweeping and mopping all floors in my house is daunting to say the least. There are still so many boxes, baby supplies, clothing, shoes, and no where to put all of them! And after trying for two days I'm going to have to put this particular assignment on the back burner. The amount of stuff we have amassed is just "cray-cray" as the kids would say. I think that might be losing my mind because of all the clutter.
So for this assignment I give myself a D+. There was effort put in, the first floor was completed, but I fizzled out :( I'm definitely going to come back to this once I get some shelving installed. Although I am disappointed that I don't have gleaming hardwood floors throughout the house, I realize it's not the end of the world (sort of). I'll post tomorrow about Day 3 of the Cure, hopefully it won't be throwing out all cardboard boxes cause I would be screwed. See you tomorrow lovies !
 |
| Clutter, clutter everywhere... |
Monday, January 6, 2014
January Cure: Day 1
Yesterday was the first day of Apartment Therapy's The January Cure (let's just call it the cure from now on , shall we?). I was super excited all yesterday during work and when I got home I sort of fizzled for a while. Let me explain, the first assignment for the cure was to walk around the house and write a list of all problem areas and what needed to be done. I live in a Row Home (duh) and I have 3 levels of living space to traverse. So when I got home all of the steps were mocking me.
Never the less I had made a promise to myself and you, oh dear reader, to take on this project and I shall see it through to the end! Well as I stated before I started from the very front of the house and made my way up each flight of steps to each living space. Part of me wants to just post the list, but I thought it would be better to just hit on a few key projects that I plan to actually undertake. Here are the highlights:
Vestibule:
-Paint
-Install wainscoting
-Replace globe light
Kitchen:
-install backsplash
-put up spice racks
-create a Coffee Corner
-create a chalkboard wall
Landing into Basement:
-measure for pegboard and install
-plan out storage for tools, cleaning supplies,
and other items
Blinds through out house:
-make all blinds into roman shades and replace
Living room blinds with Bamboo blinds
Playroom:
-Sell couch
-hang new pictures
-install more shelving for toys
-fix light fixture and hang in room
So there are the highlights. I've got a much longer list then this (I will be posting a picture of the list in my next post). This should be a very interesting journey.
 |
| The actual staircase in my house. Viewed from the 3rd floor. Weep for me. |
Vestibule:
-Paint
-Install wainscoting
-Replace globe light
Kitchen:
-install backsplash
-put up spice racks
-create a Coffee Corner
-create a chalkboard wall
Landing into Basement:
-measure for pegboard and install
-plan out storage for tools, cleaning supplies,
and other items
Blinds through out house:
-make all blinds into roman shades and replace
Living room blinds with Bamboo blinds
Playroom:
-Sell couch
-hang new pictures
-install more shelving for toys
-fix light fixture and hang in room
So there are the highlights. I've got a much longer list then this (I will be posting a picture of the list in my next post). This should be a very interesting journey.
Thursday, January 2, 2014
And We're Back
Wow, I was gone for quite a while. Did you miss me lovies? Of course you did! While the Holiday season is great fun, it's also a ton of work. Preparing meals for family and extended family can take a lot out of a person. (Even a Superwoman such as myself). I did have time to make some Christmas decorations, but unfortunately I did not document any of it. It was my daughter's first Christmas and I just couldn't stop taking pictures of her!
By the way.... Happy New Year! And what a new year it will be. I stumbled upon Apartment Therapy's January Cure and decided to participate. For those of you not in the know, Apartment Therapy emails you a project everyday for the month of January to get your whole house in order. I was SUPER enthusiastic about this as I have not had any time to organize since I got pregnant. As you know from previous posts I have a thing for organization. While I've never been what you would call "organized", I like to think that at heart I'm a professional organizer (it could happen). So for that reason I've decided to chronicle my journey for the month of January! Get excited lovies it's going to be an amazing ride!
If you would like to participate you can sign up here:
http://www.apartmenttherapy.com/its-back-join-us-get-organized-in-2014-the-january-cure-198346
And if you haven't heard of Apartment Therapy before I suggest you check them out! They have a lot of great articles as well as inspirational design from regular people like you and me.
 |
| Well there's always next year. |
By the way.... Happy New Year! And what a new year it will be. I stumbled upon Apartment Therapy's January Cure and decided to participate. For those of you not in the know, Apartment Therapy emails you a project everyday for the month of January to get your whole house in order. I was SUPER enthusiastic about this as I have not had any time to organize since I got pregnant. As you know from previous posts I have a thing for organization. While I've never been what you would call "organized", I like to think that at heart I'm a professional organizer (it could happen). So for that reason I've decided to chronicle my journey for the month of January! Get excited lovies it's going to be an amazing ride!
If you would like to participate you can sign up here:
http://www.apartmenttherapy.com/its-back-join-us-get-organized-in-2014-the-january-cure-198346
And if you haven't heard of Apartment Therapy before I suggest you check them out! They have a lot of great articles as well as inspirational design from regular people like you and me.
Tuesday, November 26, 2013
Make Your Own Wooden Letter With Cardboard
It's been sometime since my last DIY , but this particular idea has been marinating in my brain for quite a while. I've loved these little beauties for a while now :
While I do love these letters, I never felt like paying money for them, nor did I feel like purchasing wood and a jigsaw to make my own. (Although in the future I do plan on purchasing a jig saw along with other power tools.) Since my last post about my Ikea haul, we've been stuck with a lot of cardboard around the house. Rather then let it go to waste I got the idea to make these letters. A great way to recycle and get some of this unwanted cardboard out of the house.
DIY Time!!
Materials List:
-Wood Glue
-Spray Paint (whatever color you like)
-Utility Knife
-Stencil of a letter
-Cardboard (enough to make 4 to 6 letters)
-pencil

Steps:
1. Use your utility knife to open up the box so that it lays flat.

2. Take your letter stencil and trace the letter onto the cardboard. You'll want to do this about 4 to 6 times.
HELPFUL HINT: I made this stencil using Microsoft Word on my work computer. I wanted a font that was simple and clean. Making my font size 650 made a pretty good size letter ,but I wanted mine bigger. If you work in an office and your boss doesn't mind use the copy machine to blow up the image. (If you have more specific questions post in the comments below and I will get back to you ASAP!!)
3. Now that you have traced your stencil lay the cardboard on top of either a cutting mat or another piece of cardboard (we don't want to scratch up your working surface!). Take your utility knife and carefully cut out your drawn letter. Take your time, but remember if you make a little error we can go back and correct it.

4. Repeat step 3 for all 4 to 6 cut outs.
 5. Once you have all of the letters cut out line them up on top of each other. When they are lined up you will be able to see if there are some edges that overlap. Use your utility knife to trim away any excess.

6. Now use your wood glue and glue them all together. You do not need to slather the whole letter with glue, just enough to keep the edges down and the letters on top of each other. Wood glue dries pretty quickly so make sure you have the letters lined up correctly.


7. Allow the glue to dry for about 30 minutes to an hour.
8. Now here is where you can do what you want. I decided to spray paint my letter one color, but you can use colorful paper, contact paper, or stencils to color your letter. (I will be going back in a later post and making some letters for my daughter's room in different colors.)
9. Make sure that you use your spray paint outside and coat the entire letter including the sides.
10. Let dry and you are all done! Set it on a shelf, hang it up with ribbon, or place it in a frame.


 |
| http://www.etsy.com/listing/159032097/large-wall-letter-creamy-white-and-brown?ref=market |
DIY Time!!
Materials List:
-Wood Glue
-Spray Paint (whatever color you like)
-Utility Knife
-Stencil of a letter
-Cardboard (enough to make 4 to 6 letters)
-pencil

Steps:
1. Use your utility knife to open up the box so that it lays flat.

2. Take your letter stencil and trace the letter onto the cardboard. You'll want to do this about 4 to 6 times.
HELPFUL HINT: I made this stencil using Microsoft Word on my work computer. I wanted a font that was simple and clean. Making my font size 650 made a pretty good size letter ,but I wanted mine bigger. If you work in an office and your boss doesn't mind use the copy machine to blow up the image. (If you have more specific questions post in the comments below and I will get back to you ASAP!!)
3. Now that you have traced your stencil lay the cardboard on top of either a cutting mat or another piece of cardboard (we don't want to scratch up your working surface!). Take your utility knife and carefully cut out your drawn letter. Take your time, but remember if you make a little error we can go back and correct it.

4. Repeat step 3 for all 4 to 6 cut outs.


6. Now use your wood glue and glue them all together. You do not need to slather the whole letter with glue, just enough to keep the edges down and the letters on top of each other. Wood glue dries pretty quickly so make sure you have the letters lined up correctly.

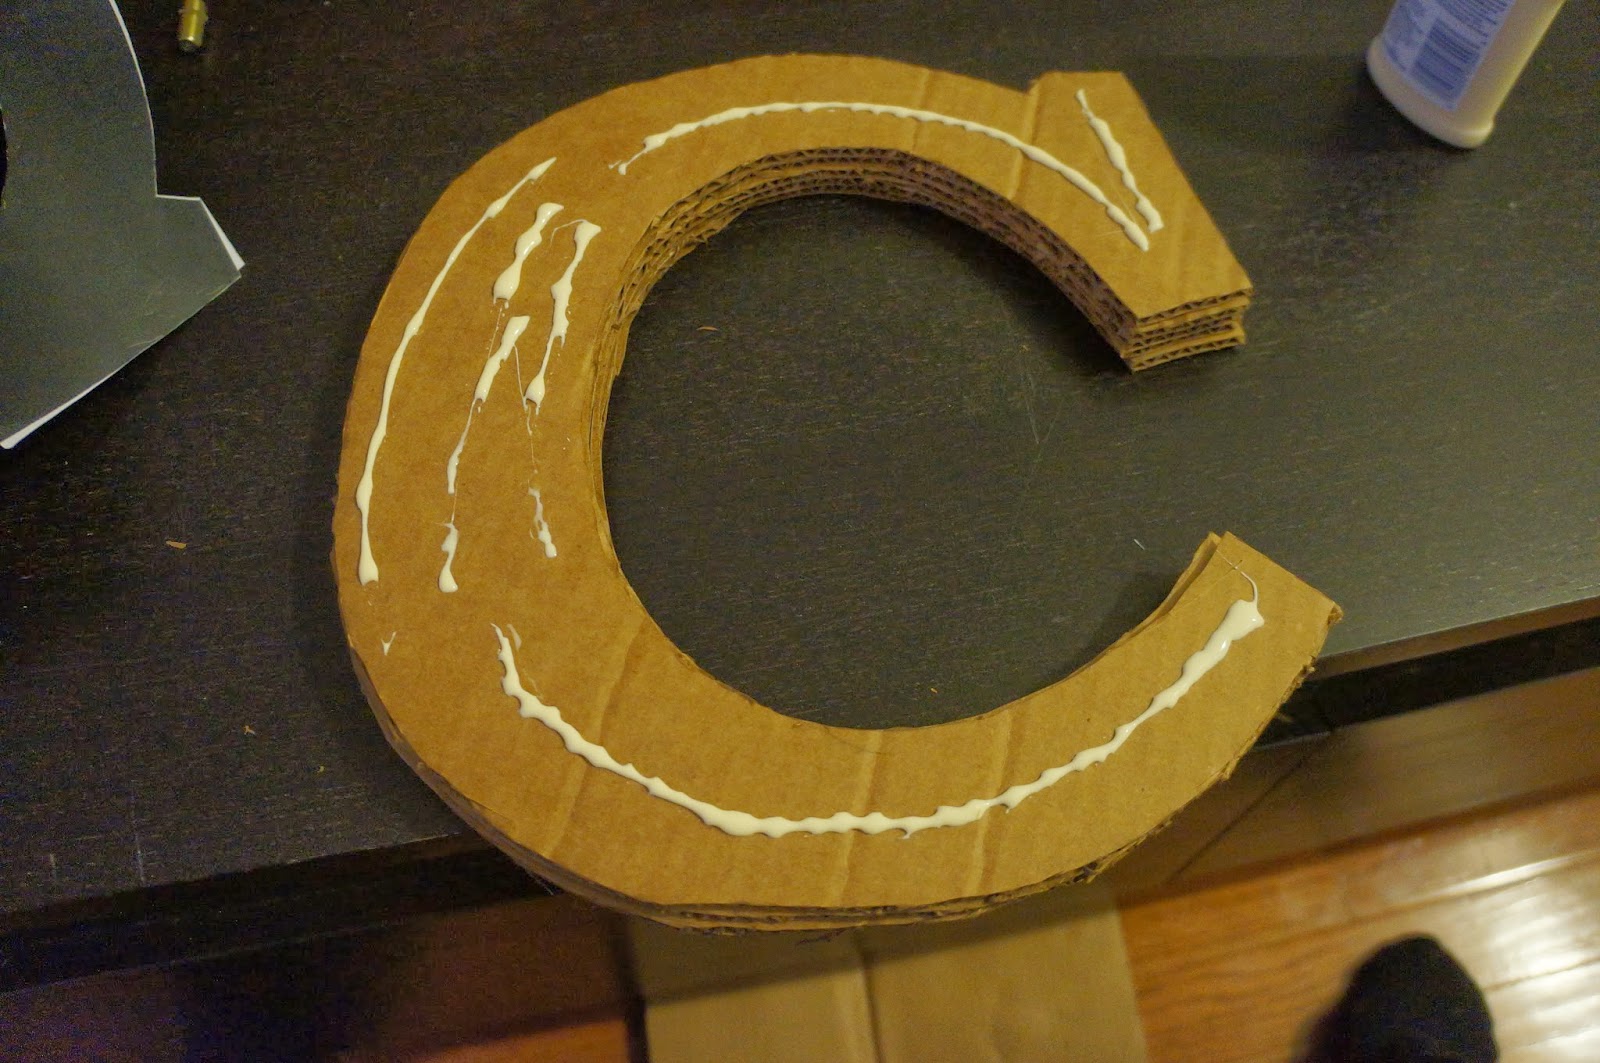
7. Allow the glue to dry for about 30 minutes to an hour.
8. Now here is where you can do what you want. I decided to spray paint my letter one color, but you can use colorful paper, contact paper, or stencils to color your letter. (I will be going back in a later post and making some letters for my daughter's room in different colors.)
9. Make sure that you use your spray paint outside and coat the entire letter including the sides.
10. Let dry and you are all done! Set it on a shelf, hang it up with ribbon, or place it in a frame.


Monday, November 25, 2013
Weekend Pinterest Round up! Centerpiece Edition
So tomorrow I will finally have a DIY for your viewing pleasure! (Being a blogger is hard work!) Until that glorious day, I've got some more pinterest projects for your enjoyment. Last Pinterest round up was about Thanksgiving decorations and crafts, this week we are going to focus in on the center piece of the table.
1. This is a great tutorial that talks about how to make grocery store flowers look great!
2. Here are 7 different centerpiece ideas that you can make yourself. Links to full instructions are listed on the website.
3. If you are feeling ambitious and have the time then this DIY pallet centerpiece is very chic and rustic.
4. Or if you have some craft paper (or an old book you don't care about) laying around then you can make this nice pumpkin center piece.
5. Finally another 5 tutorials for your Thanksgiving holiday celebration. These won't break and can probably be made with things around the house.
Well that's all for today my Lovelies. Please stay tuned tomorrow for my latest DIY project !
1. This is a great tutorial that talks about how to make grocery store flowers look great!
 |
| via Apartment Therapy |
2. Here are 7 different centerpiece ideas that you can make yourself. Links to full instructions are listed on the website.
 |
| via http://www.bellenza.com |
3. If you are feeling ambitious and have the time then this DIY pallet centerpiece is very chic and rustic.
 |
| via The Idea Room.net |
4. Or if you have some craft paper (or an old book you don't care about) laying around then you can make this nice pumpkin center piece.
 |
| Minted.com |
5. Finally another 5 tutorials for your Thanksgiving holiday celebration. These won't break and can probably be made with things around the house.
 |
| Shine.Yahoo |
Well that's all for today my Lovelies. Please stay tuned tomorrow for my latest DIY project !
Friday, November 22, 2013
Project and Clean up Weekend!
 |
| Our house....is a very, very, very fine house. |
Good morning Lovies (that's what I'm calling you now so get used to it)! Sorry I haven't posted in a couple of days , but if you read this and this then you know we have been getting prepared for the holidays. I don't know about you ,but if someone told me that after a year of living in our new home we would still have boxes, still need to paint the first floor, and still need to add shelving I would..... well I probably would have told them they were right. Even when we were moving every year (I got bored with our apartments very easily) I would always have a few boxes still packed up sitting in a corner somewhere.
Now that we have a beautiful baby girl , I feel the maddening desire to have everything organized! If you follow me a Pinterest (and if you don't you really need to) I've got two boards dedicated to cleaning and home organization. I dream of color coded binders , Google apps perfectly synced on my phone and computer so I'll never miss an appointment again, and every drawer, nook, and cranny of my house so perfectly organized that Martha Stewart herself would fall to her knees and cry. Well sadly that won't happen with boxes of books and art supplies sitting in my living room. So I've dedicated this weekend to cleaning and completing/starting my DIY projects! (Lucky you!)
So be on the look out lovies for my next DIY post. I hope that you all have a great weekend!!
Monday, November 18, 2013
Weekend Pinterest Round up!
I have quite a few DIY projects in the works, but nothing to show for it at this point. So instead of not writing anything I thought that I would share with you all my top Pinterest picks for the Thanksgiving Holiday season:


For those of your who would like to keep your Thanksgiving Decor to a minimum then this blog is for you. She even provides the links to the templates for this particular look. Check out Tice's Tidbits for more details.

This is for the parents with kids out there. A great project that your little ones can enjoy. Unfortunately there weren't any instructions listed, but the image makes it very easy to understand!

This website provides a list of festive DIY decorating ideas for your Thanksgiving get together. All of them are very simple and straight forward ways to add some Thanksgiving flair to your dinner table.

As a new Mom I'm really thankful for my first Thanksgiving with my little girl and my Husband. I have a few friends that have older children who want to be helpers. Here are some projects specifically made for them to help decorate the home.
Well that's my list of home decor projects. I hope that you all will use them and enjoy them this coming holiday. If you are interested in other things that I've pinned, then please click the follow me link on this page. Happy Thanksgiving Everyone!!
Friday, November 15, 2013
MAJOR Ikea Haul!
Today's post is all about:

So you are probably wondering to yourself "how did you wind up with two sofas when you only went in for one?" Let me explain, we originally went to Ikea to purchase this sofa for the living room:

I've been admiring the Kivik since it first came out at Ikea a few years ago, but decided that we weren't going to buy any furniture until we bought a house. Now that we have our house I finally get to have this glorious piece of Swedish design. Now if you are an Ikea shopper you know how big this store can be. Since we live in Baltimore the Ikea is on the smaller side compared to the other Ikeas (though it's still pretty damn big). Most people visiting Ikea start in the show room meandering through the well decorated furniture displays the contain dreams of what your living space could look like. Us , we always start in the As Is section. I love a good deal and if a good deal can be had it's in the As Is section. This brings me to how we came to buy our second sofa. It was this little beauty:

And it was priced like this:
 |
| Yes that is a 55% discount. |
My husband had dreams of this sofa and how it would go nicely in our daughter's play room. I too was in love with this sofa so it was a done deal at that point. I spoke about having a price point in mind when searching for Mid Century Modern furniture in a previous post here. The same thing can be applied to other furniture stores as well. So if I see a sectional for under $300 dollars I'm buying it end of story. In addition to our sofa purchase I also bought the Ikea Sy sewing machine that I had been researching for a while. I'm a beginner when it comes to using a sewing machines so this should be interesting. I'll write a post later to let you all know how that goes. We also bought a grey and red slip cover for the Kivik sofa (the red one was in the As Is section marked down from from $100 to $20).
So there you have it, our Ikea haul. Not to bad for one evening's work. Now I just have to get home and start decorating and that's the fun part :)
Wednesday, November 13, 2013
I like coffee, she likes tea
My Mom is the best. The End.
Well not quite the end. She is staying with us for a year to take care of my daughter while my husband and I work. How great is that?! There is no way to thank her for all that she has done (unless I win the lottery and break her off a few million dollars ). So I try to do little things here and there for her. My mother is a HUGE fan of iced tea (growing up in south will do that to a person). She is also a fan of saving the planet and likes to reuse the plastic coffee cups that I get from 7-eleven or Starbucks. That sparked the idea for this project.

DIY TIME!
I'm going to make her an iced tea glass. Here is what you will need:
-Old spaghetti jar or mason jar
-Drill
-Spray Paint
-Tape
-Stencil
-Paint marker (that draws on glass)
Cost: Between $5 and $10 dollars (depending on what kind of paint pen you buy)
Step 1.
Clean the jar thoroughly. Get all the goo off from the label so that you have a nice clean surface to work with. Tip: If you don't have goo gone then just use some anti bacterial hand gel. Just squirt it on the jar and rub it in a circular motion. Or if the label is still attached to the jar submerse it into boiling water and let it sit. After a while the label, along withe the adhesive, will come right off.

Step 2.
Take your stencil and tape it where you would like inside of the jar. I decided to go with my own design. But if you aren't that confident in your writing or design skills then are pre-made stencils available online.

Step 3.
Once you have placed your stencil where you want it, trace over it with you paint pen on the outside of your glass.


Step 4.
Now as we let the paint dry on our glass, lets get out the drill. So first things first, SAFETY! Mark off where you would like the hole. Make sure your drill bit is secure and you have enough room to work. Keep your fingers clear of the drill at all times! (If you have a piece of wood to set the cap on it will provide you with a steady work surface.)

Step 5.
I ran a piece of steel wool around the hole just to make sure it wasn't to jagged. Wash the cap and let it dry. Note: There were some pieces of the lid still attached were I drilled. I took a pair of needle nose pliers and worked it back and forth until those small pieces fell off.
 |
| No drilling picture because it was too cold outside. My bad. |
Once the cap is dry spray paint whatever color you would like, I'm using black. Make sure the outside is evenly coated. DO NOT COAT THE INSIDE WITH SPRAY PAINT!! Let dry for a few hours (I'm paranoid about paint and like to be on the safe side).
 |
| I did NOT spray paint this on my dining table. I used a small cardboard box and sprayed it in there. |
Step 7.
Screw the lid back on the jar and you are done! Just fill with ice and tea , then sit back and enjoy :)


I LOVE YOU MOMMY!!
Tuesday, November 12, 2013
I'm in the Houzz
Also Titled 5 6 Reasons Why Houzz Will Solve All Your Home Decorating Needs
When I tell people about Houzz I get a "what are you talking about" look. They think that Houzz is just about a bunch of million dollar homes and of products that would surpass any mortal budge. To all of that I say WRONG!! Let me enlighten you about the joys of Houzz.com.

1. There are loads of pictures for your inspiration.


I thought that I would start with the most obvious reason people visit Houzz. The inspirational rooms are breath taking! But did you know that regular members (many of whom are not interior designers) post pictures of rooms in their homes as well? Just because you didn't higher some world renowned interior decorator doesn't mean that you can't show off the work that you have done.
2. If you see an item that you like in an inspiration picture you can find out where to buy it.

3. All of your home shopping needs in one place.


And when I mean in one place , I mean in one place. You can shop for lighting, tile, kitchen sinks, linen, sofas, anything your heart desires can be found here. You can buy directly from the Houzz site (there is an area you can fill in your credit card and shipping information) or be directed to the website where the item may be purchased.
4. Look at reviews for any professional that you might need.
 |
http://www.houzz.com/pro/michellemillerinteriors/michelle-miller-interiors |
5. The discussions section is the most over looked and the most helpful portion of the site.

 |
| I mean come on!! All of these people are giving you free advice! |
Imagine a place where professionals and non professionals look at pictures of your design dilemma and not only give you tips, but walk you through every single step of the decorating process. I'm talking about posting a link to the sofa you should buy, or an interior designer drawing a mock up of your space with how you should arrange your furniture, or how best to arrange the accessories in your room.
6. Or if you are just nosey (like me) you can watch a whole room transform.
I've done it. I've read through a whole thread with over 600 comments and watch a barren room be transformed into something out of a magazine. All that with the help of professionals and every day home owners.
So that's my list. I hope that you enjoyed and will check out Houzz. If you do you should totally follow me so that we may exchange decorating ideas:
http://www.houzz.com/user/kiyoshima
Not my usual DIY article , but I really do feel strongly about this site and believe that not everyone knows all of the features that are available. Do you have a home decorating website or forum that you believe is great? Let me know in the comments sections below this article. That's all for now!
DISCLAIMER: I do not work for Houzz nor am I being paid by them to write this (I wish I were!). I just wanted people to know how the site can help them since many people I've spoken with didn't know all of the features of the site.
Subscribe to:
Posts (Atom)